
You can literally just vibe code things (here's how with Claude Code)
Finally, the era of the ideas people

Welcome to the 1,026 of you who have joined us since last newsletter, it’s great to have you :) And in some exciting news… we hit #9 in the business rising list! Never did I ever even remotely imagine reaching this point, so thank you as always for the support xx
In 2023, OpenAI co-creator Andrej Karpathy went insanely viral with what has become one of the most iconic tweets in AI.

This is vibe coding. Building software by chatting to a computer instead of writing hundreds of lines of code or manually customising a Squarespace/Shopify/SaaS template. Essentially, you can ‘fully give into the vibes’ because the stakes are so low.
Since then, it’s taken a chokehold on product managers, engineers, and startup founders. But the one group it hasn’t reached nearly enough are the ideas people.

The people who know what needs to exist in the world.
As I write this, I’m thinking of someone I work with. Every second day he comes into the office with a new idea, ones that are really good. And these ideas don’t just sit there. He actually does something with them, and quickly.
These are the people who need vibe coding. Because by building things, you innovate. By innovating, you create value for yourself, your company and the niche pockets of society who resonate with what you do. When have we ever been so fortunate as a species that we can take an idea and 20 minutes later have it out in the world?
But in my experience, ideas people are the very individuals who are least likely to have the time or interest to sit down and figure it all out.
That’s who I’m writing this guide for.
A few weeks ago I built my own website with Claude Code. I thought it was about time, but I also wanted to keep building my vibe coding muscle. I knew that if I built something like this, I’d take the cap off the other ideas I could bring to life.
Over the next 10-15 minutes, I’ll walk you through the five steps I used to do it, including how to get it off your computer and onto the internet (which is the part that used to intimidate me most) and leave you with a few of the best vibe coding ideas I’ve seen.
Now, can you just open Claude Code or Codex and ask it to create something without going through this whole process? 100%. If you’ve never vibe coded before, that could be the best place to start.
But my goal is to help you build something you’ll actually use for years, not just something random. My website is that. Here’s how yours can be that too.
This is Issue 6 of the Claude MBA Series - a practical guide to help you build with Claude, not just learn about it.
Know someone who could use non-hype AI education?
Step 1: Create your vision
I need to start this with a small tangent, but I promise it will come back full circle.
Two years ago, I set a vision for my life. Every month since then, I’ve been re-visiting and refining it.
Today, I’m living out a good portion of that vision. I moved to the Gold Coast. I’m living in a home I’m obsessed with. I have a job I love, a side hustle that’s growing every day. Much of this happened in the past six months and I’m putting it down to one thing: finally mastering the habit that had been eluding me for years. Meditating every morning. Or more specifically, visualisation meditations.
Every day, I spend ten minutes strengthening the vision for my life, seeing it, feeling it, living it out. I’m clear on exactly what I want, and so what I want is being built in front of my eyes.
Vibe coding works in exactly the same way. You cannot build something you are obsessed with unless you can describe exactly what it looks like and feels like.
The practicalities
In practice, this means having answers to some key questions before you start building anything:
What do you want to build?
What should it look like?
Who will be using it?
What is it’s main purpose?
What must it not do or include?
What features should be present?
How should it work, and how will you know when it’s working the way you want?
Some of these answers should come from you. Some from the users. Some from your team. Some from market research. It depends what you’re building and who it’s for.
For my website, the answers looked something like this:
A two-page site for Dangerously Educated, mobile-first, with a main goal to get people onto the newsletter. The secondary goals were to build credibility, act as a landing page for the Claude MBA, and feature a small section for enquiries about partnerships, speaking or consulting work. The audience was time-poor, cynical about hype, and not interested in anything that felt like a funnel. Non-negotiables on the “must not include” list included countdown timers, fake testimonials, anything that looked like a generic SaaS template or internet marketer landing page, anything too busy.
My exact answers went into much more detail, because the more clearly you can describe what it is, who it’s for, and what it absolutely cannot be, the less rework you’ll do later.
The vibes
The second part is developing a picture of how the tool should look and feel. This comes from two places:
Your own imagination (provided you can clearly describe it to an AI tool)
External inspiration: designs you like from Pinterest, high converting websites you’ve seen, or tools you’ve used. I pulled a lot of my web design inspiration from websites like land-book.com, dribble.com and framer.com.
My preference is always to create your own Frankenstein rather than copy another website. Pull together multiple inspiration sources, pick out elements you like from each, and make a note of what they are and why you like them.
For my website, I worked from:
GoGetta: I liked the vibe of it, particularly the clean structure, clear spacing, and a polished but non-corporate feel with pops of colour. This is why visuals are so helpful - I could never quite describe that vibe but the screenshot showed Claude that the balance between interesting and calm was what I was after.

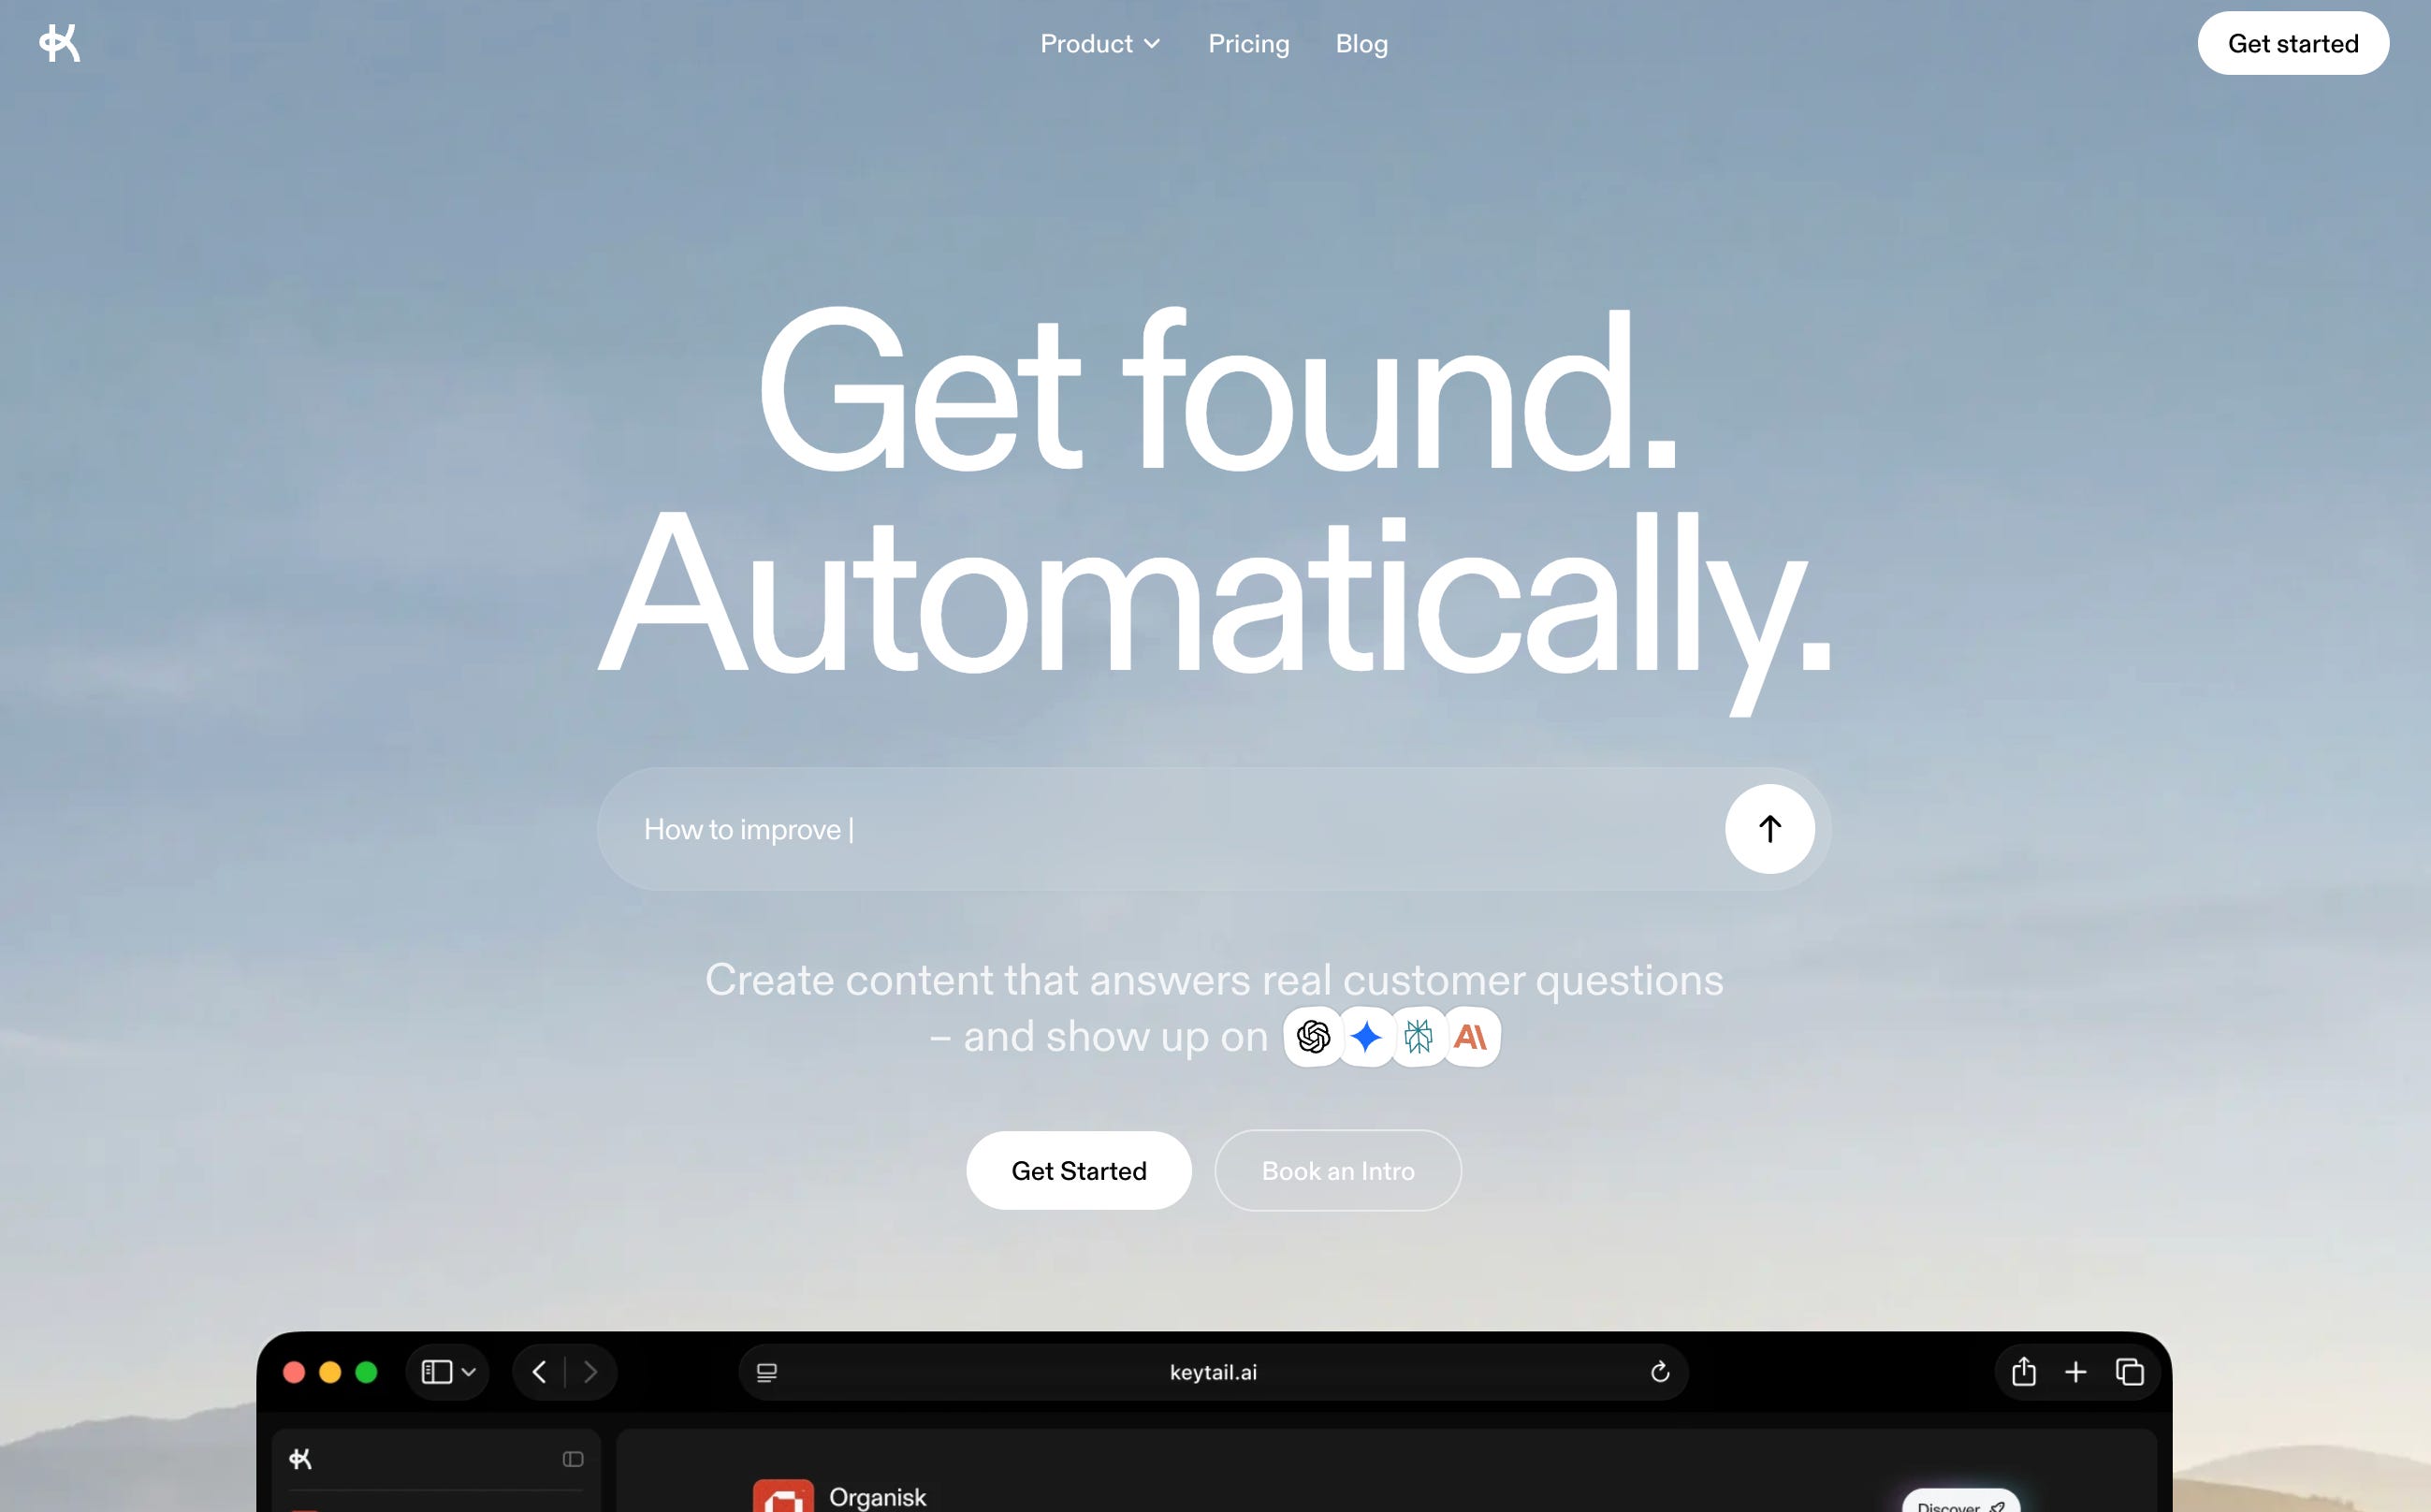
Keytail: The hero grabbed me immediately. It felt modern without being noisy. I wanted some of that energy in the hero section, just without the full SaaS dashboard feel that runs through the rest of it.

My own brand assets: carousel designs from my Instagram, screenshots of my Claude MBA and my brand colours so the site felt like a natural extension of what people already knew rather than a completely separate thing.

By the end of this process, the goal is to have one document. A big page of notes in front of you with answers to the questions above, annotated screenshots, and inspiration.
I won’t lie, as someone who doesn’t love the design side of things, finding ‘the vibes’ was probably the hardest part of the entire process for me. However, it’s a very good muscle to stretch in the world we’re heading into. You’ll learn pretty quickly that the initial ideation and brief often takes longer than the build itself.
Step 2: Create your PRD
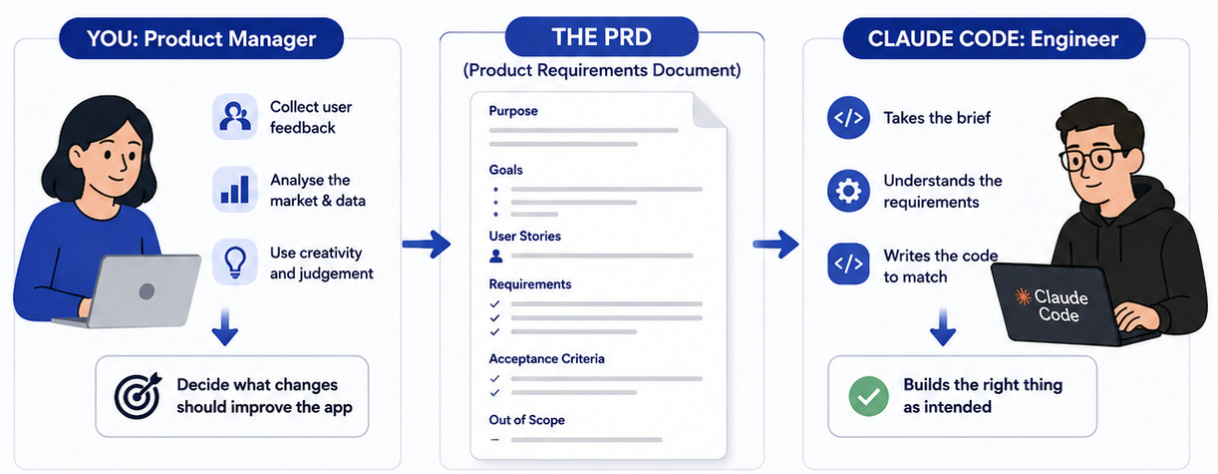
Product managers have been using Product Requirement Documents (PRDs) for decades to brief developers.
Think of an app like Instagram. The product manager’s job is to collect user feedback, analyse the market and use data and their own creativity to decide what changes should be made to improve the app. The engineer’s job is to take those briefs and edit the code to match. If something gets lost in translation, the end result will look very different to the product manager’s vision.
In our case, you’re the product manager. Claude Code is the engineer. The PRD translates what you want into clear specifications that Claude can follow.
(This is why so many product managers are obsessed with vibe coding. They can test a new feature in 100 different ways and figure out which version of it works best before asking engineers to permanently make the change).
I’m not a product manager. I’ve never designed an app. So I asked Claude to walk me through the process.
The PRD I created for my website ended up being 1,400 lines. That document became the source for the entire build, so every conversation in the project started with that context fully loaded. The more thorough you are here, the less you’ll be fixing later.
It’s a simple as opening a new conversation in Claude Chat, attaching your notes document from step 1 and using this prompt:
You are my vibe coding assistant, skilled in product design and software development.

I want to make an [app / website].
[Give an overview of the app - what it is, the problem it solves, what you want it to do, what it looks like, any other details you already know]

Your task is to:
1. Research best practice for creating a PRD for Claude Code
2. Review the attached document with my notes on what the app should do and how it should look.
3. Ask me as many questions as you need in order to write a PRD that will generate the exact app that I want. Ensure you have enough information on:
a. Who is this for, just me, or other people too?
b. How should it work? What's the one main thing it needs to do?
c. What should it look like? Prompts me to go to pinterest and find inspiration if I am stuck.
d. What must it not do or include?
e. How will I know when it's working the way I want?
3. Provide me with the PRD (that I can download as an md file)

Assume I have no knowledge of coding or building an app.
Claude came back with 15 questions I hadn’t thought of - many on the technical side. I answered them using Resonant (a text-to-speech tool) so I could just talk through my thinking rather than type it all out. By the end, I had a complete PRD.
Read it in full when it’s done. Change anything that doesn’t look right.
And please, actually do this part!
I skipped it on my first build and hated what came back. It was super boring. The colours were way off - the yellow was too bright, there were reds that had nothing to do with my brand, and Claude hadn’t pulled from my website copy file at all. I rebuilt the PRD from scratch and started the build again. A bit of time now saves a week of rework later.
Step 3: Build your tool
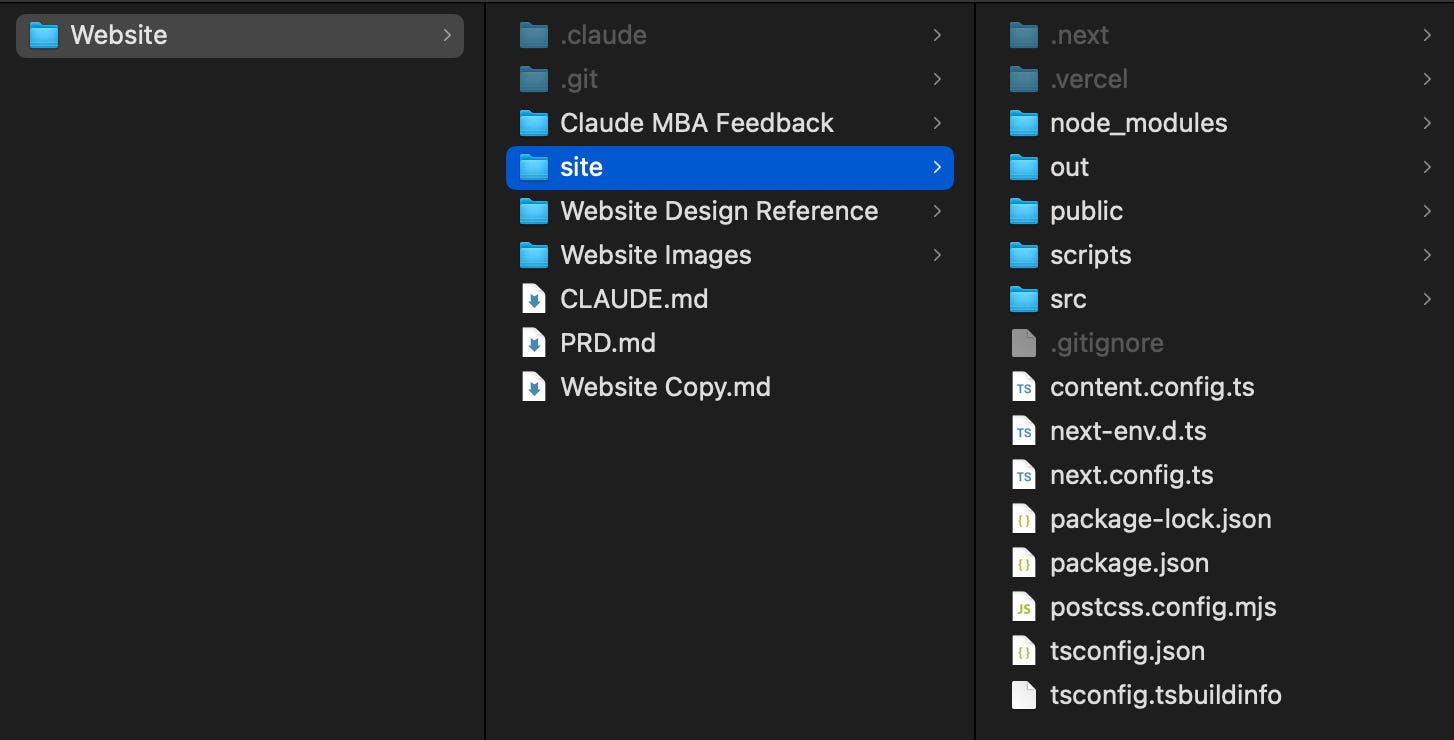
Just like any other task, the better the context you give Claude Code, the better the result will be. At a minimum, to start this stage you need a dedicated folder for Claude Code to work in. Inside that folder, make sure you have:
A Claude.md file with basic context about whatever you’re building your tool for (i.e. your company, personal brand, or personal situation). If you’ve been following the Claude MBA, this is already done.
The notes document you created in step 1
The PRD file you created in step 2
Any reference files you want Claude Code to use
These reference files could be branding guidelines, images to include, or more detailed information about your business or target audience. I actually went through the process of working with Claude Chat to write the copy I wanted to include on my website.
But this isn’t essential. If you don’t have the website copy already written, make sure you have a few files with voice guidelines and context needed for Claude Code to write good copy for your tool.
For my website, I also saved HTML files (not just screenshots) from GoGetta and Keytail directly into a Website Design Reference folder inside the project. Claude code read and replicate design decisions from the code in these HTML files. You can grab the html file for any website by pasting the link into a site like www.view-page-source.com
Once that file is ready, open Claude Code in your IDE (introduced last week). Because all your context is living in your file, creating your tool is now simple.
1. Upgrade Claude’s design abilities
Claude can design a website. But if you use it straight out of the box, you’ll probably get a pretty average, very AI-looking tool.
So before we build, we want to install Anthropic’s official frontend design skill. This ‘levels up’ your Claude Code by giving it specific rules to follow when designing and building your tool.

Open your folder in your file explorer, and using Plan mode with Opus as your model, paste this prompt:
I want to build [insert brief description of what you want to build]. Start by installing Anthropic's official frontend-design skill. Then read my CLAUDE.md, PRD.md and any other reference files you have access to. These are stored in my [insert folder name] folder.

Based on this, write a plan for what you're going to build.
Claude will walk you through exactly how to install the skill.
Then, it will think and come back with a plan. Again, read and review the plan. Change anything you don’t like. Whatever is in that plan, Claude will build, so it’s worth taking some time to make sure it’s right.
Once you’re happy, switch to Ask before edits and let it build.
2. Build your tool
You’ll see Claude create a new sub-folder and start building out a bunch of files. This is completely normal.
When it’s finished, Claude will come back to you with a message mentioning something like
http://localhost:3000
This is a web address that you can use to view and test websites or applications locally on your own computer before they’re put on the internet.
So to preview your tool, you need to open your terminal and run the local server.
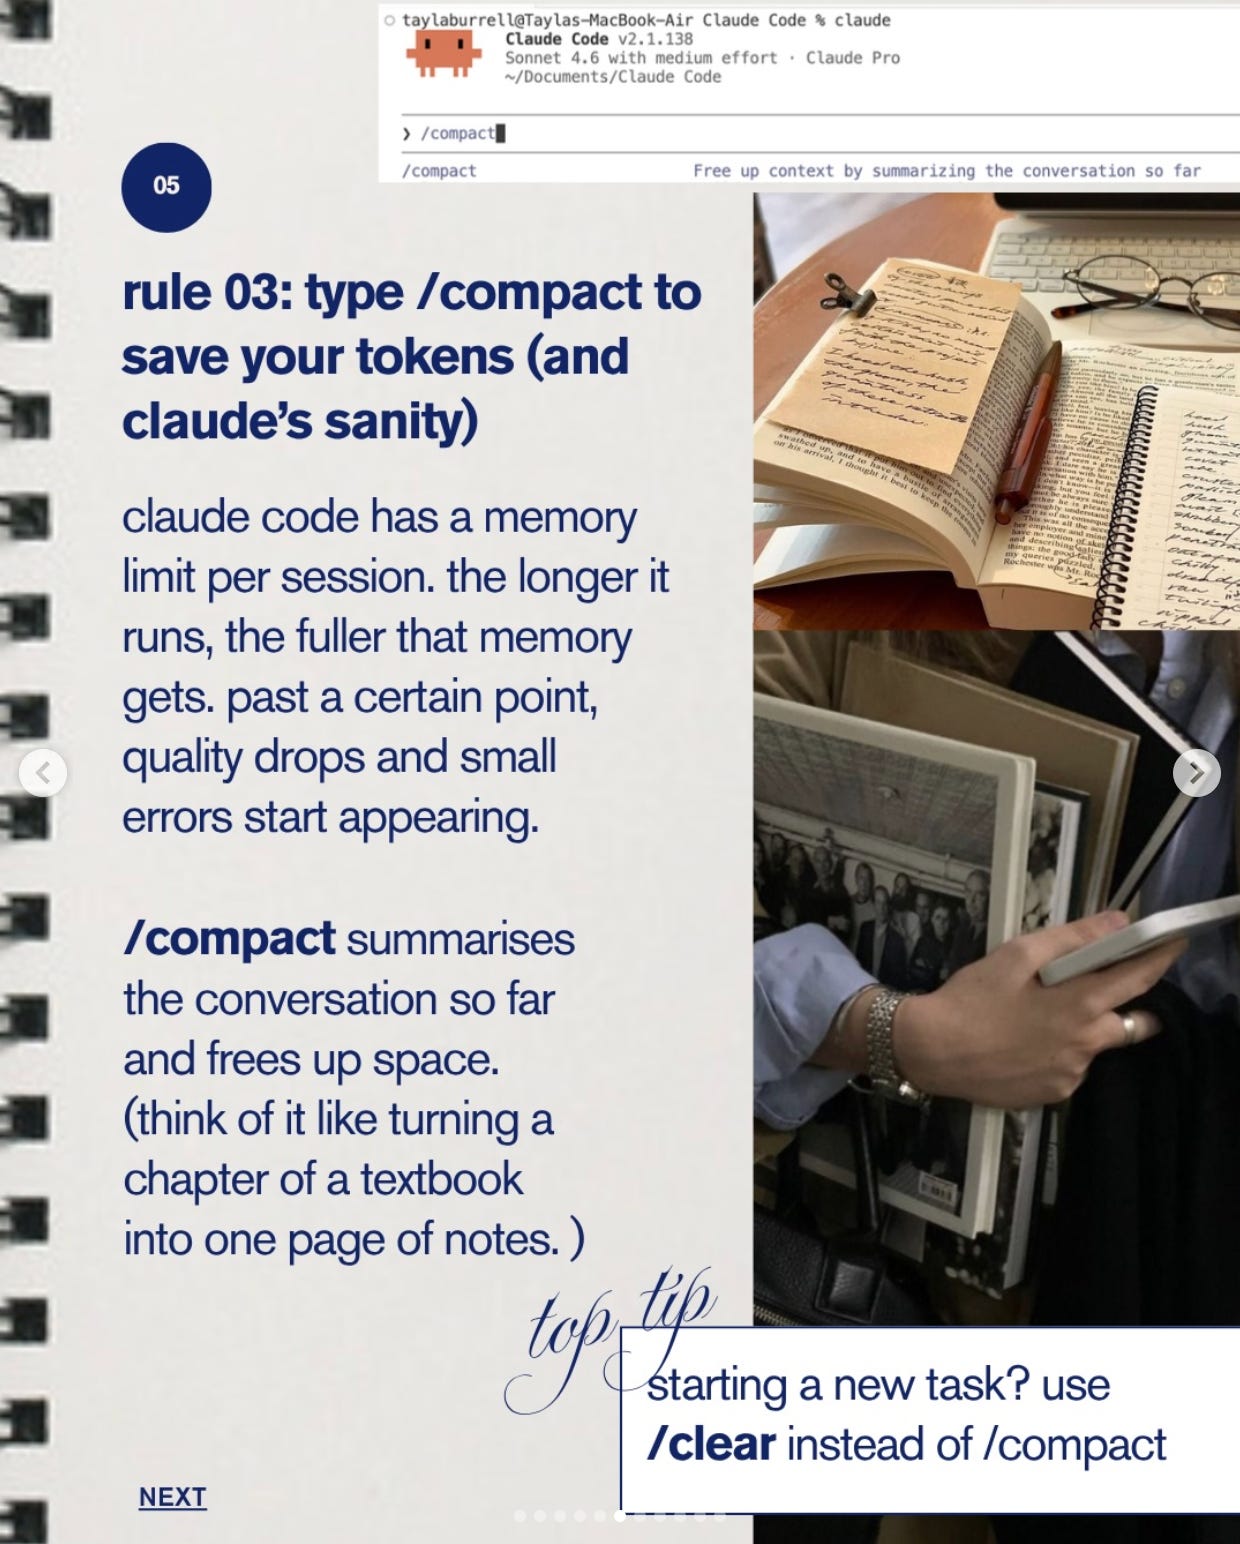
I spent more time on this than I’d like to admit. In the end I just asked Claude: “I don’t know how to preview my site locally. Walk me through it from the beginning.” It was much simpler than I thought.
3. Iterating
If Claude one-shots a perfect website, you have created a world-class PRD. In my case, I saw the website, took a minute to process that this entire thing was built in one go (still kind of blows my mind), then immediately found a whole collection of features I wanted changed.
This is normal.
My favourite way to do this feedback process is again using a speech-to-text tool. I opened the site in my browser, went through it section by section, and just talked through what I liked and what needed to change. I sent this message to Claude, used plan mode so Claude would write a plan for the changes before making any of them.
It’s the same loop each time. Plan first. Review the plan. Then build.
Step 4: Share it with the world
This is the part that always intimidated me the most. I have this perfect website, but how do I actually share it with the world?
When you build with tools like Lovable or Replit, they give you a link as part of the process. With Claude Code there are a few extra steps, but what you get is a proper setup with your code backed up and tracked, your site hosted on a real platform, and a workflow that makes future updates simple.
We do this using two tools:
GitHub is where your code lives. Think of it as Google Drive, built specifically for code. It tracks every change so you can see what was edited and roll things back if something breaks. GitHub doesn’t make your site live - it stores and manages the files.
Vercel is what makes it live - taking the code from your GitHub repo and publishing it on the internet. Essentially, it’s a ‘frontend cloud platform’ for hosting the servers an application needs (web host, application servers, database servers, load balancing servers, etc.) in a way that is less expensive and more scalable than buying physical machines and hosting them in a data centre.
Every time you push an update to GitHub, Vercel picks it up and republishes automatically.
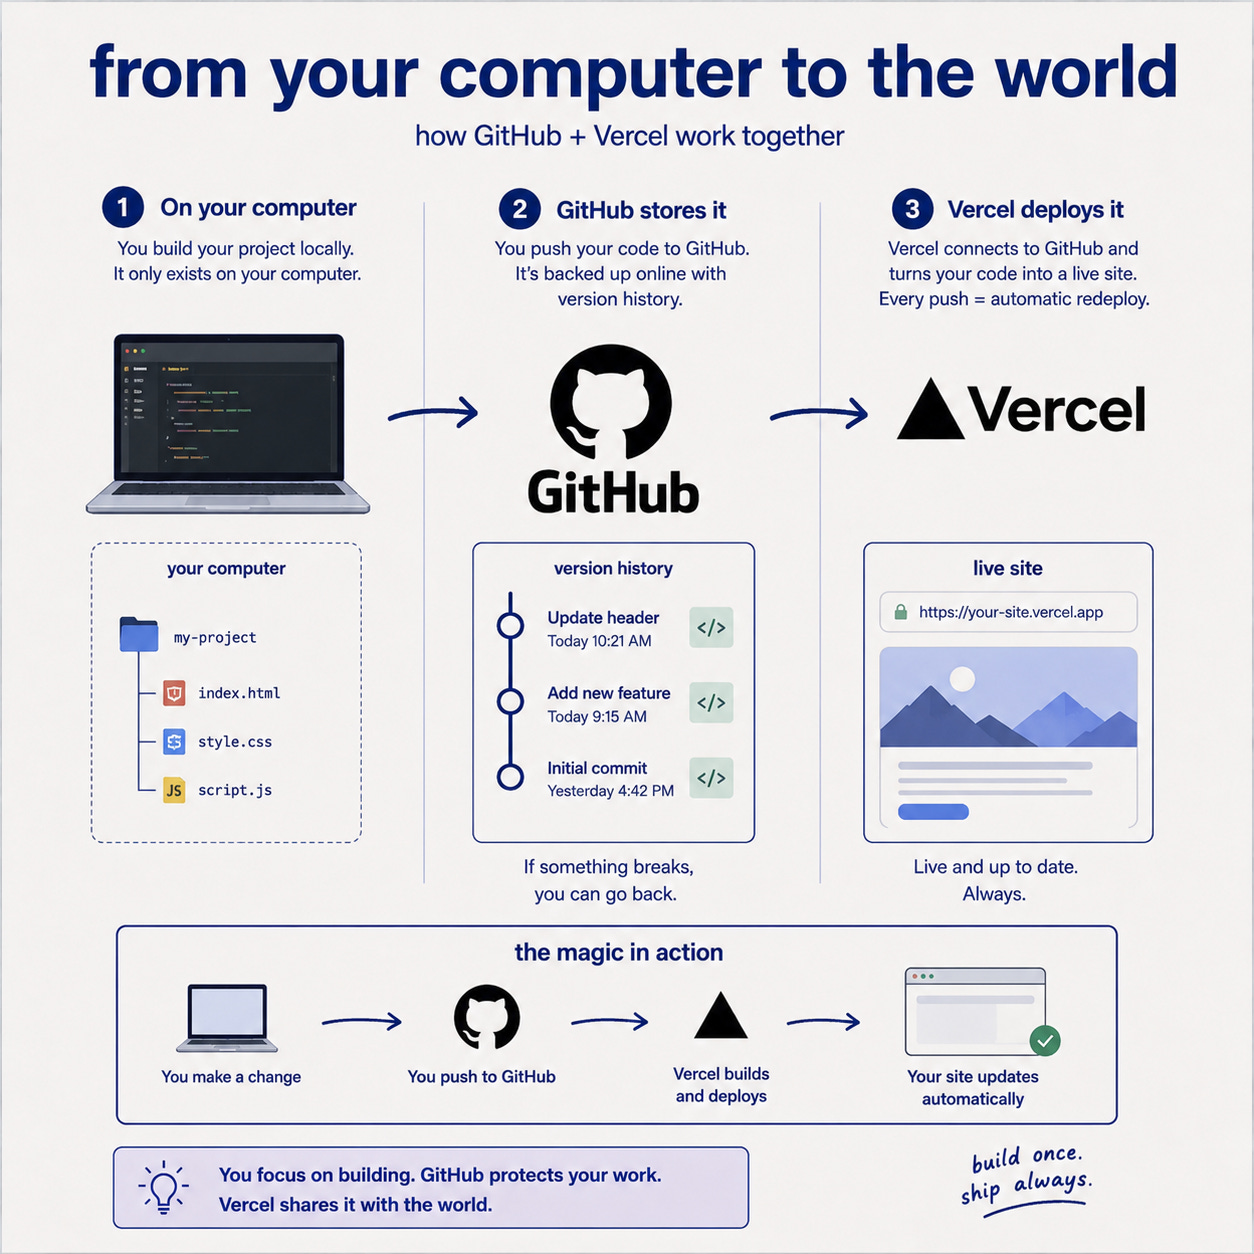
The Claude MBA gives you a prompt that walks through how to take your website, store the code in git and deploy it with Vercel:
Setting up a Git repo in your folder
Connecting it to GitHub
Pushing your code so it’s stored online
Connecting your GitHub repo to Vercel
Getting your live URL
Step 5: Updating and maintaining
Once your site is live, the process for making changes isn’t complicated.
For smaller updates (think: a new section, a copy change, fixing something that’s bothering you) open a new conversation in Claude Code with your project folder and describe what you want changed. Claude already has all the context from your website files.
For bigger changes that affect the structure or purpose of the site, start in plan mode or consider creating a new PRD. I’d recommend doing this directly in Claude Code now, as it has far more context than a normal Claude Chat conversation would, so the questions it asks and the PRD it produces will be better.
Expanding your vibe coding vision
Before I wrap up, I want to give you some inspiration. Because I’ve seen people building some of the most incredible tools with Claude Code, and I want you to see what’s possible. You don’t know what you don’t know. You could be limiting your imagination of what you can build by what you’ve already seen built. So here are a few use cases that have stayed with me, and that might change the ceiling on what you think is possible.
The event ecosystems
A few months I was listening to an episode of Diary of a CEO, and Daniel Priestly brought up the idea that 12 months from now, events won’t just be events. Conferences won’t just be 2 weeks of learning stuffed into 2 days and workshops won’t just be 3 hours of intense focus with no follow up support.
Instead we’re entering the experiential world, where ecosystems exist around events - before during and after - that keep people inside the experience.
Two weeks before, you receive a login to a custom-built platform with pre-reading, a community, and a way to connect with attendees. The day of, an app that maps the experience for you, recommends who you should meet, helps you take notes and tells you where to be. In the month following, a tailored program turns what you heard into key areas to execute, while keeping you connected with other attendees.
I mean, it makes so much sense.
The in-person space is booming because people are CRAVING human connection. But the same story always follows - people get busy, they forget and move onto the next things. A tool like this can be built right now. Consider what that makes possible.
The personal pitching tool
I built a “Get to Know Tayla” app as part of a job application. A custom-built, interactive experience designed like a use it like a chatbot. The founder could ask it a recommended question (or a custom one) and it walked them through who I am, what I’ve built, and how I think. I build it in about an afternoon, and I got the job.
The scope expands so far beyond just job applications. You can use it for pitching to a sponsor or to speak at an event, as a company yourself in your hiring or sales process. You could even create your own media kit linked to your analytics across platforms.
Find more inspiration
Georgie Healy (a fellow Australian tech gal) shares vibe coding ideas in her newsletter each week (along with other brilliantly fun takes on AI). Worth a look if you’re searching for inspiration!
Lenny Rachisky shared what people are actually vibe coding - 50+ useful/fun/clever examples of what non-technical people are building. Some of them are paywalled, but many are free.
Have you built anything yourself or seen a cool use case? Leave a comment below!
Even as someone who keeps up with AI closely, in never fails to amazing me just how much creating will empower you in ways consuming never could.
I now look at problems and think ‘how can I solve this with software’?
I’ve started paying more attention to smaller details - the design of my favourite apps, the user experience of websites, small inconveniences that could become ideas.
Sometimes you just need that first-hand experience of building something for yourself to fully realise what’s possible.
Phase 5 of the Claude MBA Action Plan has everything you need to get started - the full setup, the PRD process, and your first build, step by step. Grab it free below if you haven’t yet.
And if you do build something, leave a comment and share what it is. I’m super curious to see what people come up with
This is free because I wish someone had handed it to me. If it helped, pass it on - send it to the work bestie who keeps saying they want to build something, or the group chat that was going to start a business together.
What I like here is that you are writing for the people with ideas who have been standing outside the build process assuming it belonged to somebody else.
That is a real audience, and a growing one.
The strongest part for me is your insistence that the brief is not a side step. It is the work. Getting clear on the vision, the audience, the non-negotiables, the feel, and what success actually looks like is what makes the rest of the process usable instead of random.
I also appreciate that you walk people past the “cool demo” stage and into the part that actually scares a lot of beginners, which is getting the thing off their computer and into the world. That matters.
There is something genuinely empowering about helping non-technical people stop seeing software as a sealed room they are not allowed to enter. This piece opens the door.
Another enormously helpful (and also just interesting to read!) post. Thank you!!